Home page
SPONSOR AD

Support our Vendors!  |  Advertise Here

Topic: New long tube headers and Extensions have arrived

in Forum: C4 Fuel, Emission Control, and Exhaust Systems


Already a Member?
Login
Not yet a Member?
Register for Free!

Back to Forum List
New TopicNew Topic-Locked
ReplyReply-Locked
New PollNew Poll-Locked
Search
Hide Signatures
New long tube headers and Extensions have arrived (1/8)
 3/22/09 9:32am
LT1*C4
Standard Member
Send Private Message

Canada

Vette(s):
1992 Corvette Black on Black ZF6 6-speed LT1 EM headers/Corsa exhaust


Joined: 3/22/2009
Posts: 34

NOTICE: (I just updated this thread a few posts down with pic's of the original exhaust manifolds now that I've removed them and all the emissions fittings. I'll continue to update the thread as the project continues...)

Thought I'd post up a few pic's I just took of  the new headers and extensions I ordered a few weeks back during a group purchase on another Corvette Forum.

For those who aren't too sure on spec's on EM's headers, they are ceramic coated inside and out and have 1 3/4" primaries. As you can see from the pic's they're  full length headers as opposed to the shorties that come standard on these cars. I ordered them along with their header extensions as well, (also ceramic coated) which should allow me to bolt everything right up to my Corsa exhaust  without the need for any cutting/welding.

Since I had no plans on retaining neither the A.I.R. or EGR  system's  on my LT1, the headers were ordered without the emissions provisions. By going this route, I also had to purchase a set of A.I.R. & EGR block off plates from TPIS.  I made the decision to ditch the A.I.R & EGR not because I thought I'd make any more power by doing so, (I know I wont) but simply to reduce a lot of clutter under the hood and make for a cleaner engine compartment (not to mention an easier to work on engine)

Finally, I ordered a custom prom which eliminates the EGR and A.I.R. functions entirely so there won't be any chance of getting any error codes thrown after the install.  Hopefully the custom tune will add a few hp as well...

Felpro gaskets, Split-lock header bolts and a pair of new O2 sensors round off the parts list.

As soon as the weather gets warm enough outside, I plan on doing the installation myself though in all honesty, I'm a bit nervous as this is my first Vette and I've never done a header install on these cars before.  I'm a bit nervous since the C4's engine compartment looks so cramped and some of the header bolts (especially the one closest to the firewall on the passenger side) look to be a real nightmare to reach.  I hope I'm not getting in over my head with this install...

Anyway, from what I've seen so far, I'm happy to say I'm glad I went with the EM headers.  They appear to be a very well constructed product. The ceramic coating on both the headers and extensions is very well done and the headers themselves have nice thick flanges and clean welds throughout.  Definitely a top-notch product.

There are a lot of header threads out there and I'm sure more will be started here on the C4 Registry.  Unfortunately, there's very few pictures of headers themselves.  Hopefully these pic's might help some people decide on which headers to go with.   The EM's are a bit pricey, but as the old saying goes, you get what you pay for...

I'll periodically update this thread with pictures of the install, along with some video when the car's up and running.  I can't wait to hear what it will sound like.

:flag:


LT1*C42009-04-04 17:27:22
Reply-LockedReply-Locked
Reply w/QuoteReply w/Quote-Locked
Our Sponsors help support C4VR
New long tube headers and Extensions have arrived (2/8)
 3/22/09 11:49am
Black Shark
Standard Member
Moderator
Send Private Message


Vette(s):
Black 1979 L-82 Black 1996 LT1 Black 1999 Coupe


Joined: 3/20/2009
Posts: 611

They do look very nice.

When I installed my TPIS, I just didnt disconnect the battery...it was easier to remove it, unbolt a few components and move them for install...those that had wires or cables still attached I wrapped in a towel or small blanket and duct taped them out of the way....some were simple and I just unbolted them or disconnected to electrical and set them in a box.

It was easier and faster to remove these few components than trying to work around them...it also made for easy cleaning of areas and correct gasket installs...I also changed a couple of hoses, and wires while I had the room...I also disconnected, cleaned and retightened several ground wires for various components...because I had the room to do it.

By doing this I also found areas for preventative maintenance on items that were soon to go to the wayside....hoses, vacuum lines and even the plastic vacuum lines fittings/T's...all were problems that would of been a PITA to diagnose, find, and/or replace with the engine intact.

Believe it or not one item about to go bad was the harmonic balancer...it was a great find....it would of been a problem that would of been overlooked when it reared its symptoms....alternator bearings, timing chain cover oil leak, coolant by-pass hose were other items I found that was about ready to implode or explode...however you want to look at it....

I figure it caused 30 to 40 minutes more of reinstalling components, but the acessability, effeciency, replacement of other parts, cleaning, and completing a complete ground circuit on a plastic car made it worth every minute.

Do it how you like, but you cannot beat accessability, cleanining, and preventative maintenance in tight engine compartments by going the extra mile and inspecting because you have access.


Souds like a lot just for a header install...but it isnt that much more than what will have to be removed to do it correctly anyway.


Thats my $.02 when I did my 96.


GL
Jim
Reply-LockedReply-Locked
Reply w/QuoteReply w/Quote-Locked
New long tube headers and Extensions have arrived (3/8)
 3/29/09 5:54am
takoda
Standard Member
Send Private Message

plymouth, MA - USA

Vette(s):
1985 bronze vette


Joined: 3/22/2009
Posts: 33

looks like a nice set up let us know how it goes and pics would be great
Reply-LockedReply-Locked
Reply w/QuoteReply w/Quote-Locked
New long tube headers and Extensions have arrived (4/8)
 4/4/09 5:26pm
LT1*C4
Standard Member
Send Private Message

Canada

Vette(s):
1992 Corvette Black on Black ZF6 6-speed LT1 EM headers/Corsa exhaust


Joined: 3/22/2009
Posts: 34

Thought I'd update this thread for anyone who's been interested in the topic.  Today, I began the process of removing the original exhaust manifolds and emissions systems from my '92 C4.  The weather's only about 2 degrees outside but I just couldn't wait any longer and figured I'd get started on the install.   

Fortunately, most everything has gone pretty smoothly so far.  My biggest concern originally, was having a seized header bolts snap off inside the cylinder head.  It's happened before on some installs I've done in the past and believe me, it's not fun at all getting them out.

All but two of the bolts came out surprisingly easily.  One on the drivers side which held the alternator brace in place and one on the passenger side which held the dipstick tube in place were the only ones to give me trouble.  After repeatedly soaking them with penetrating oil and heating them up with a torch, they finally broke loose.  

Interestingly, the bolt closest to the firewall on the drivers side wasn't even there !! :Dead.   I guess it must have slowly loosened itself over the years and eventually just fell right out.   On the bright side, this just meant there was one less bolt I had to take out.

I also removed both the EGR and A.I.R. systems components since I'll no longer be running them after the header install.  I switched the position of the bolt in the engine mount on the passenger side as per EM's instructions (I'm guessing this is done due to clearance issues) and took some the time to clean up as much of the frame as I could, since I now had much more clearance after taking off the manifolds.  

It's amazing just how much dirt grease and grime builds up over time.  I must have gone through 7-8 rags and a whole can of WD-40 but at least now it's a lot cleaner than before Tongue

The only set-back I have was that I accidentally broke a sensor located on the passenger side cylinder head when I was removing the old manifold.  I believe it's a coolant temperature sensor of some sort so I'll have to get that replaced Monday.

Tomorrow I'll begin the installation of the headers themselves.  Hopefully everything will go well and everything bolts up and lines up they way it should.   The car should be ready to go by Monday evening after I pick up the coolant sensor after work and put it in.

Anyways, here's a few pic's of the old manifolds and a shot or two of the engine as it sits right now. Notice in the third photo down how all the emissions equipment has been eliminated.  All the lines, fittings, vacuum hoses and valves have all been removed.  This will make for a much cleaner engine compartment.  

  Tomorrow I'll post some pics of the headers when they're on the car as well as some side-by side shots of the headers and factory manifolds to better illustrate the difference between the two designs. 

Stay tuned. Smile


LT1*C42009-04-04 21:17:08
Reply-LockedReply-Locked
Reply w/QuoteReply w/Quote-Locked
New long tube headers and Extensions have arrived (5/8)
 4/4/09 7:13pm
Black Shark
Standard Member
Moderator
Send Private Message


Vette(s):
Black 1979 L-82 Black 1996 LT1 Black 1999 Coupe


Joined: 3/20/2009
Posts: 611

Looks good so far.

RE: broken sensor---
if its the one attached to that green weather-pack with the black and green wire is see disconnected, it is a temp sensor...10 or 12 bucks if you dont mention its for a Vette....just make sure you buy the right temp range if you try to buy for a different make.
( ie. cross reference part numbers)


Jim
Reply-LockedReply-Locked
Reply w/QuoteReply w/Quote-Locked
New long tube headers and Extensions have arrived (6/8)
 4/4/09 8:38pm
LT1*C4
Standard Member
Send Private Message

Canada

Vette(s):
1992 Corvette Black on Black ZF6 6-speed LT1 EM headers/Corsa exhaust


Joined: 3/22/2009
Posts: 34

[QUOTE=strats-n-vettes]Looks good so far.

RE: broken sensor---
if its the one attached to that green weather-pack with the black and green wire is see disconnected, it is a temp sensor...10 or 12 bucks if you dont mention its for a Vette....just make sure you buy the right temp range if you try to buy for a different make.
( ie. cross reference part numbers)


Jim
[/QUOTE]

I just snapped off a few pic's of the connector and the sensor.  The sensor appears to only have one prong when you first look at it but upon closer inspection, it looks as if maybe it had 2 at one point and  the second broke off when the sensor was hit?  Looks weird.  The back of the connector only has one wire going to it and the front appears to only accept 1 prong.

Does this sensor only use one prong or two?  Is this the coolant temperature sensor you're reffering too?  I looked up the part and all the pictures I see have two prongs in them.  If that's the case, then it looks like my connector may have to be replaced as well since I don't see a second contact point for the second prong.

Darn it.  I'm all confused now. 

Any help would be appreciated.


and here's a picture of this part on line.  See how it has two prongs?


LT1*C42009-04-04 20:46:10
Reply-LockedReply-Locked
Reply w/QuoteReply w/Quote-Locked
New long tube headers and Extensions have arrived (7/8)
 4/5/09 6:47pm
Black Shark
Standard Member
Moderator
Send Private Message


Vette(s):
Black 1979 L-82 Black 1996 LT1 Black 1999 Coupe


Joined: 3/20/2009
Posts: 611

[QUOTE=LT1*C4] [QUOTE=strats-n-vettes]Looks good so far.

RE: broken sensor---
if its the one attached to that green weather-pack with the black and green wire is see disconnected, it is a temp sensor...10 or 12 bucks if you dont mention its for a Vette....just make sure you buy the right temp range if you try to buy for a different make.
( ie. cross reference part numbers)


Jim
[/QUOTE]

I just snapped off a few pic's of the connector and the sensor.  The sensor appears to only have one prong when you first look at it but upon closer inspection, it looks as if maybe it had 2 at one point and  the second broke off when the sensor was hit?  Looks weird.  The back of the connector only has one wire going to it and the front appears to only accept 1 prong.

Does this sensor only use one prong or two?  Is this the coolant temperature sensor you're reffering too?  I looked up the part and all the pictures I see have two prongs in them.  If that's the case, then it looks like my connector may have to be replaced as well since I don't see a second contact point for the second prong.

Darn it.  I'm all confused now. 

Any help would be appreciated.


and here's a picture of this part on line.  See how it has two prongs?


[/QUOTE]


Maybe for the electric fans????....The bottom looks like my temp sensor.
Also; the location is the same as all my temp. sensors, 1979 L82, 1999 Silverado w/Vortec, 1996 LT1.

some temp sensors are also made with one wire for certain app.'s (ie. idiot lights)
Some car models also have more than one temp sensor for various app.'s...open and closed loop after warm-up, electric fans, gauges, ect...all in different locations per vehicle.

IIRC...whether its for the electric fans or temp gauge, they both will work (if for fans)...but I am gonna say the broken one is for the fans, and the actual sensor for the temp gauge is on the drivers side, and needs two prongs to read correctly.

Not %100 sure though......I am old. ----LOL


GL


Jim


Reply-LockedReply-Locked
Reply w/QuoteReply w/Quote-Locked
New long tube headers and Extensions have arrived (8/8)
 4/12/09 4:53pm
LT1*C4
Standard Member
Send Private Message

Canada

Vette(s):
1992 Corvette Black on Black ZF6 6-speed LT1 EM headers/Corsa exhaust


Joined: 3/22/2009
Posts: 34

Sorry it's taken so long to update but I've been really bust at work as of late and never got a chance to update the thread.

In a nut shell, the headers are finally in and the car's up and running.  Unfortunately, things didn't go as smoothly as I thought.  After getting the passenger side header in place and holding it in with a pair of bolts, I crawled back underneath the car just to double check that all was well before I tightened anything up.  Right away I noticed that the headers was making contact with part of the frame.  The first idea that popped into my head was to grind away the corner that the header was making contact with. But before I took the grinder to anything, I decided to pay a visit to Corvette Forum and see if anybody else with EM headers run into the same problem I was having.  Perhaps they had found an easier/better way to resolve the issue...  

A quick search revealed that the problem I was having was in fact, quite common as there were many threads posted by members having the identical problem as me with te exact same spot on the frame.  "Grinding" seemed to be the solution everybody else had resorted to, so I went ahead and did it myself.  I ended up grinding away about 1/4" of material and the header no longer rubbed in that particular area.  

The instructions that come with these headers made no mention of having to grind away anything for clearance.   Since this problem is clearly quite common, I think EM should start letting people know about it in their instructions....

After grinding the problem area, I began tightening the header bolts in sequence starting from the middle and working my way out towards the sides.  That's when I ran into my 2nd problem.  One that unfortunately wasn't as easy to fix as the first one.

The primary tube closest to the front of the engine (#2 cylinder) was right up against the frameCry 

There was no literally NO clearance at all.  Not even enough to slide a piece of paper through.  Worse yet, the primary tube closest to the firewall (#8 cylinder) was also right up against the frame near the bottom.

All the header bolts were now fully tightened and there wasn't any way around this issue that I could see.  Needless to say, I was absolutely livid.  Angry

I decided to continue on with the install and worry about the passenger side clearance issues later since I was already at the point of no turning back. The drivers side header went in without a hitch and thankfully, I had (at most) about 1/8" of an inch clearance at it's tightest spot.  darn tight, but enough to get by....

After the headers were now both installed and fully tightened, I got back underneath the car and began removing the exhaust so that I could install EM's extensions and piece the exhaust back together working my way back out towards the rear bumper.  That's when I ran into my 3rd problem.  The drivers side header extension was nearly 3/4" too long compared to the passenger side.  This meant that the Corsa resonator would not line up flush with the extensions.  Either the drivers side was too long, or the passenger side was too short.  Take your pick..  Cry

I ended up cutting the drivers side, so that both extensions were of equal length. It was the easiest solution I could come up with and fortunately, it worked well as the rest of the exhaust bolted right up again.


After double checking to make sure everything was all buttoned up and ready to go, I got in the car and started her up.  Not surprisingly, there was a SEVERE vibration throughout the entire car.  Felt like I was sitting in a top fuel dragster or a Harley with open pipes.  

Since the passenger side header was literally on top of the frame.  The vibrations of the motor shook the entire car to the point of it being unbearable.  Cry

As a last ditch resort, I waited until the engine got up to operating temperature and then wrapped a pry-bar up with blanket.  From underneath the car I began to ever so gently "pry-out"  on the header hoping it would bend just enough so that it wasn't touching the frame.

Well, it was only worth less than an 1/8" of an inch but there now was the tiniest bit of a gap between the two problem primary tubes and the frame.  The car no longer shakes as much at idle or while cruising but when I reverse it or I'm just getting off the line from a dead stop, the car still shakes a bit.  Only for a split second and some people might not even notice it but I do, and I'm still a bit miffed. Cry

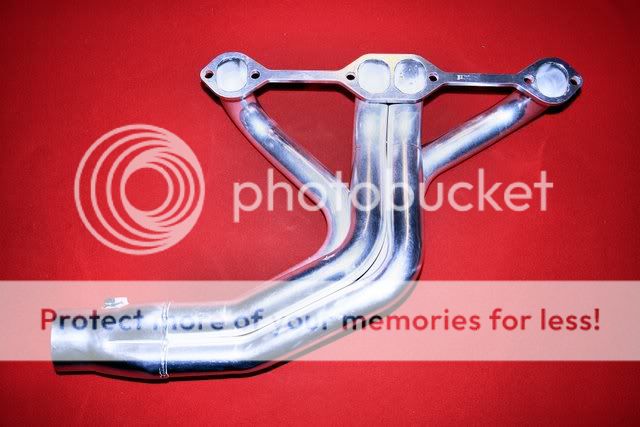
Another issue I had was tightening the header bolts.  If you look closely at the pictures, you'll see that the bolts are so close to the primary tubes, that a "regular" wrench was just too "thick" and wouldn't even get around the bolt because it was hitting the primary tubes.  I had to take a wrench and literally grind it down to the point where it was paper thin just to get access to the bolts so I could tighten them.  The stock manifold bolts wouldn't even fit these headers as they'd hit the primary tubes.

 I ended up not reinstalling the alternator support brackets as the new "split-lock" header bolts were not long enough to hold the brackets in place.  So far, I've noticed no ill-effect with the alternator or accessories, even with the A/C switched on.  Hopefully it will remain that way...

------------------------

On the plus side, installing long tube headers completely transformed my car.  Power and torque is up throughout the entire rpm range and 1st, 2nd and part way through 3rd gear are all basically useless now, since the back tires will go up in smoke at anything past 1/2 throttle. :eek:

I was worried for a while there that installing LT's on a basically stock LT1 wouldn't give me the kind of power increase I'd been expecting given the fact that so many on this forum had stated as much.  Basically, many said that because the LT1's exhaust was so efficient, there wasn't much to be had by upgrading the exhaust when the motor was still stock.  Dead

I found this very odd since I got huge gains putting on headers on a previous car of mine, an LT1 4th gen Firebird.  Was the Firebird's exhaust that much more restrictive?

Anyways, all worries were put to rest the moment I floored the car and the tires lit up and I went side ways in first, then second, then part way through third.  Clap

Anybody who says LT's aren't worth it on a stock motor is completely out to lunch.  It's a night and day difference. The car pulls like a raped ape.  :lol:   The new exhaust tone is also music to the ears as well.  At wide open throttle, the Corsa's SCREAM!!!  Better yet, there is basically zero drone in the car even without the cats.

I'll see if I can post up a sound clip or two later on tonight for all to hear.


---------------------

All in all, here are the pro's and cons of this little project...


Pros:

- HUGE gains in power and torque throughout the rpm range
- Much more aggressive exhaust tone

- Even with no cats, the headers did not add any interior resonance (this is mostly due to the Corsa exhaust I'm using though.  Other brands may get different results

- Easier access to plugs/wires

- No EGR/AIR means much cleaner engine compartment

- Less heat under the hood

- Headers shaved off 32 pounds off the front end compared to the cast manifolds  (26 pounds/each vs 10 pounds/each)


Cons:

-  Major clearance issues with the passenger side header.  One was remedied with the use of a grinder, the others were "mostly" remedied (though still a problem) by using a pry-bar to "pull" the headers away from the frame

- Clearance issues with the drivers side header extension (I had to cut off 3/4" to get the resonator to line up with it.

- Ceramic coating is easily scuffed (even the cardboard box it came in was enough to scratch up the coating in certain areas.


- The bolt holes in the flange are so close to the primary tubes, that trying to tighten the header bolts was nearly impossible.  I had to grind down a wrench to the point where it was paper thin just so I could use it to tighten the bolts and not interfere with the primary tubes

--------------------------------


All in all,  I guess the pro's outweigh the cons.  I'll be emailing EM tonight and asking for their input as to why I'm having all these clearance issues and what (if anything) they'd recommend on how to add just a wee bit more clearance on the number 2 and 8 primary tubes to keep them from hitting the frame.

Any suggestion and/or comments are more than welcome.

Big smile

.
.
.
.
.
.LT1*C42009-04-12 19:51:55
Reply-LockedReply-Locked
Reply w/QuoteReply w/Quote-Locked
Our Sponsors help support C4VR